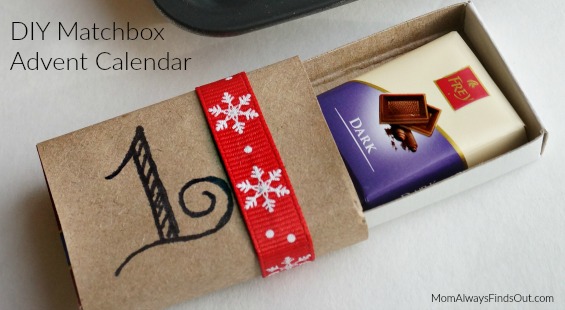
The Advent Calendar is a popular holiday tradition to help you celebrate the days leading up to Christmas. This DIY advent calendar uses numbered matchboxes, which can be filled with small candies, notes, pictures or trinkets. I made a chocolate Advent calendar by putting a mini candy bar inside each one of the boxes.

Making your own Advent Calendar like this one is really easy to do, and doesn’t take much time at all.
I spray painted the cookie sheet ahead of time, so it would be dry and ready when I needed it.
If you are learning how to do hand lettering, this is a nice project for lettering practice. Use your favorite brush markers to write the numbers on each box.
It’s time to get as creative as you want! Turn this DIY Advent Calendar into your own by using colorful gift wrap or scrapbook paper to wrap the boxes.
Use a different color ribbon or washi tape. Use stickers or ink stamps to decorate the outside of the boxes.
Project Materials Needed:
- Brown Kraft Wrapping Paper
- Red Ribbon
- Tape
- Peel and Stick Magnetic Sheets
- Small Cookie Sheet (I used a Dollar Tree one that measures 9×13 inches. Here is a similar one on Amazon.)
- Spray Paint (I used black chalkboard spray paint)
- Scissors
- Black Permanent Marker
- Optional: Command Strips (for hanging)
- Optional: White Chalk Marker
TIP: If you want to skip the wrapping matchboxes step, use plain white or brown craft matchboxes. This saves time, which could be especially nice if you need to make multiple advent calendars.
Directions:
1. Spray paint the cookie sheet and allow the paint to dry completely according to the can’s directions.
2. Cover the outside of empty matchboxes with kraft wrapping paper. Be sure not to wrap the sides of the box where it slides out.

3. Tape a ribbon around the matchbox. Use a marker to number the matchboxes 1 through 25.

4. Cut a piece of magnetic sheet to fit on the back side of the matchbox. Peel and stick the magnet on the back of the box. This is how you will attach the matchboxes onto the cookie sheet.

5. Fill each of the Advent Calendar boxes with a small piece of candy, note, money or other tiny trinkets. I put a mini chocolate bar inside each of the matchboxes so there’s a sweet treat for every day of Advent. Arrange all 25 matchboxes on the cookie sheet as desired.
I decided to decorate my painted cookie sheet with a white chalk marker. I drew snowflakes and wrote “Christmas” and “Countdown.” You could write whatever you want on the cookie sheet or leave it blank.
Use Command Strips to hang your Advent Calendar on the wall. If you don’t want to hang your calendar, simply set it out on a table with the rest of your Christmas decor.

Don’t miss out on fun craft ideas and more! Please follow me on Instagram, and @momfindsout on Pinterest and Facebook. I love it when you will tag #momfindsout if you create and share your craft!
Let me know if you have any questions about how to make this DIY Advent Calendar. Feel free to share your ideas for tiny things to go inside the Advent boxes. Enjoy!


sahana says
Such a great idea. I really love the hand lettered numbers. #HomeMattersParty
Nicole says
Thank you, Sahana!
Lorelai @ Life With Lorelai says
What a fun advent calendar idea! And such a sweet surprise too. 🙂 #HomeMattersParty
~Lorelai
Life With Lorelai
Nicole says
Thanks, Lorelai. Yes, those little mini chocolate bars are the perfect fit for the boxes and so good! –Nicole
Crystal Green says
This is rather cute and simple. I am glad you shared this idea with us on the #HomeMattersParty.
Nicole says
Thank you, Crystal!
Michelle James says
Such an adorable advent calendar Nicole!! #homemattersparty
Nicole says
Thank you, Michelle!