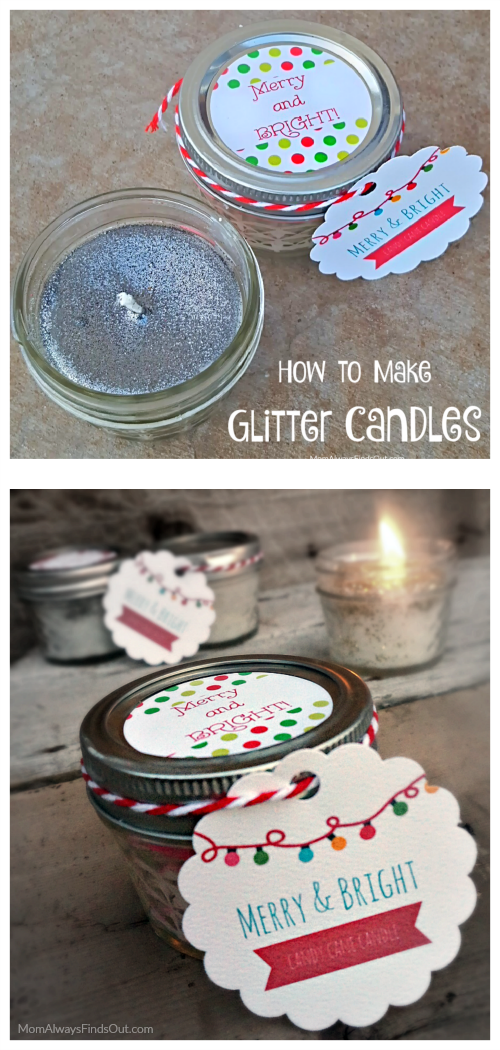
I love the glitter tin candles I found on Pinterest and think they make the cutest homemade gift ideas. I didn’t have any metal candle tins, but I did have sweet little 4-ounce mason jars to make pour candles in. They are cute, too!
Be sure to check out the other #PinterestRemakes you’ll find linked at the end of this blog post.
This was my first time making homemade candles, and I was really happy about how easy it turned out to be. All I really needed to do was melt and pour the wax. Of course, I had to be careful because melted wax is very hot and can burn. Melted wax can make a mess if you spill it, so I highly recommend laying down newspaper to protect your work surface. I also read a few tutorials about how to make candles before I gave it a try on my own.
Another thing to note before you melt wax is that you will want to melt it in a pot you don’t need for anything else. Wax is really hard to clean completely off the pot. I melt wax for other projects, so I have a dedicated wax melting pot to use and reuse. I added Peppermint Essential Oil to scent the candles. By the way, if you don’t have a double boiler, you can try doing what I did. I made a makeshift double boiler by putting my melting pot inside a bigger pot filled with boiling water. It works.
Beeswax Glitter Candles
Materials Needed:
- 4 mason jars (4-ounce size) with lids
- 2 cups Beeswax Beads
- 1 cup Coconut Oil
- Cotton Candle Wicks (square braid is recommended for Beeswax)
- Glitter (any color)
- Glue Dots
- Pencils or pencil sized wooden dowels
- optional: 1/2 ounce Essential Oils for scent
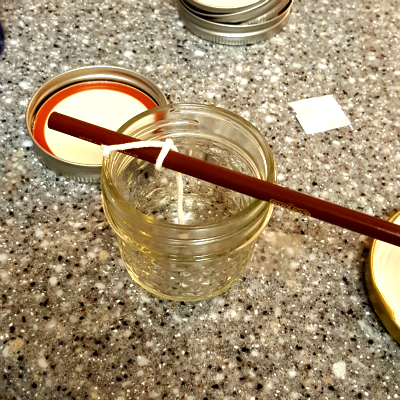
Step 1: Prep your jars by cutting a length of candle wick that is long enough to reach from the bottom of the jar to about 1-2 inches above the jar. Use a glue dot to secure the candle wick to the bottom center of the inside of the jar. Tie the other end of the wick to the pencil (or wooden dowel) laid across the center of the top of the jar as pictured below. This will keep the wick securely straight up and in the center of your candle while the wax hardens (this will happen in step 3.)
Step 2: In a double boiler, melt Beeswax Beads over medium heat, stirring occasionally until the beads are completely melted. This takes about 8-10 minutes.

Step 3: Add Coconut Oil to the melted Beeswax, stirring until it is completely melted. This takes about 2-4 minutes.

Step 4: Remove the pot of melted wax from heat and pour into jars. Be sure to leave space at the top – I left about 3/4 inch. Immediately sprinkle the tops of the candles with a thick layer of glitter. I used about a tablespoon of glitter per candle. You want the glitter to “sink” a bit into the wax before it hardens. Allow candles to sit, unmoved, for 24 hours to fully set and harden.

Step 5: Remove the wick from the pencil (dowel) and trim it to about 3/4 of an inch. The candle is now ready to use. If desired, put the jar lid on top to cover.
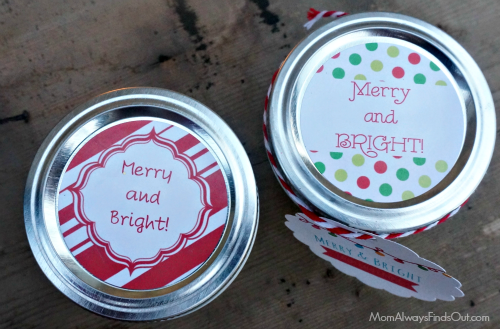
I give these peppermint glitter mason jar candles as Christmas gifts. I printed my own “Merry and Bright” sticker labels for the jar lids using Avery 2-inch Round Labels and holiday-themed label templates found on the Avery site. The templates are very easy for anyone to use. I also used one of their templates to make and print gift tags using Avery Scallop Round Tags. I tied the tags around the jars using red and white baker’s twine.
Have you ever made candles? Do you want to give it a try? Let me know how your beeswax candles turn out!
Check out more Pinterest Remakes from some of my favorite blogs!
- 5 minute Christmas ornament by Confessions of an Overworked Mom
- Snickerdoodle dairy free Christmas cookie recipe by Our Homemade Life
- Whipped White Chocolate Body Butter by Food Fun Family
- Popsicle Stick Snowflake Wreath by Mom Does it All
- Snowman Sugar Cookie Sticks by Sincerely, Mindy
- Easy DIY Reindeer Ornament Your Child Can Make by Mommy Snippets
- Skillet Apple Cranberry Crisp by Upstate Ramblings


Mistee Dawn says
These look so pretty! I definitely need to make some of these and give them as gifts!
Nicole says
Thanks, Mistee!
Ellen Christian (@ellenblogs) says
That looks like fun. I’ve always wanted to try my own candles.
Nicole says
It was fun and much easier than I thought it would be.