OREO Turkeys are a Thanksgiving tradition at my house. Read on to see how to make OREO Cookie Turkeys.
It’s one of our favorite Thanksgiving activities for kids. We think OREO Turkeys are the cutest edible decorations!
Thanksgiving Ideas: How to Make OREO Turkeys
There’s usually a ton of people at our family’s Thanksgiving dinner, so we have to set up multiple tables. The adults sit at one, and the kids sit at the other.
The kids table is a lot more fun to sit at when we give them something fun to do there, like make OREO cookie turkeys.

Set out a DIY OREO Turkey bar so everyone can make a turkey before the big meal or it could be set out as a reward for kids after they eat the real turkey dinner.

OREO Turkeys look really cute on the table. In the past, we have had the kids make enough OREO turkeys ahead of time so we could put one at every single place setting.
They are super cute, edible Thanksgiving decorations! Have you ever made an OREO turkey?

How to Make OREO Turkeys
What You’ll Need:
- OREO cookies *Double Stuffed OREO cookies work best (2 per turkey)
- Mini peanut butter cups (1 per turkey)
- Candy eyes
- Orange, Yellow and Brown coated candies
- Candy Corn
- Chocolate Frosting in a Can
- Plastic Knives

Directions:
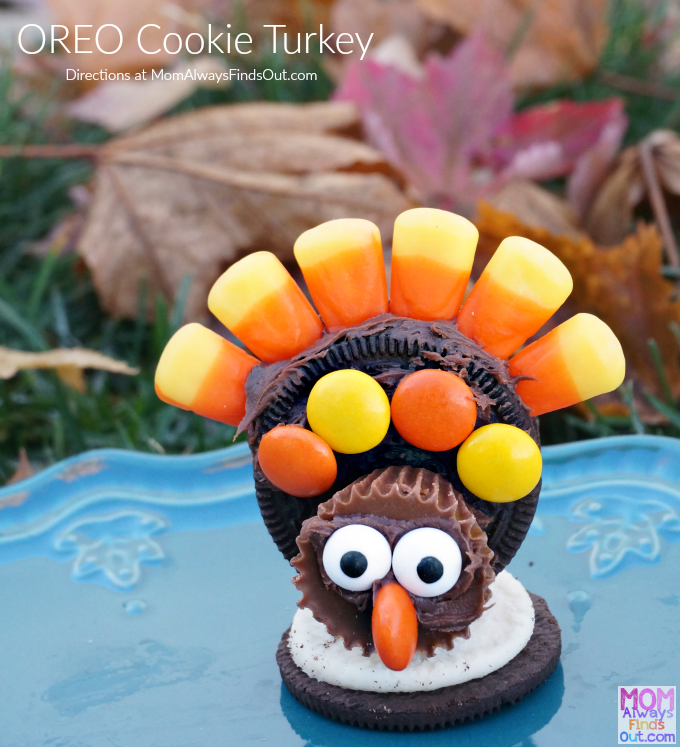
1. Use a plastic knife to apply chocolate frosting along the top edge of an OREO cookie. The frosting is basically the “glue” that is going to help hold our turkey together. Feel free to use as much as needed.
Carefully stick the tips of 6 candy corns into the OREO cookie’s white frosting. *This is why Double Stuffed OREOs work better – there is more room for the candy corns to fit into the cookie.
The orange and yellow part of the candy corns will stick out and look like turkey feathers.
2. Use frosting to attach the peanut butter cup to the lower half of the OREO cookie for the turkey’s head.
Add more frosting to place the candy eyes, coated candy beak (we used orange) and various colors of coated candies above the peanut butter cup turkey head.
3. Carefully twist open another OREO cookie and place the OREO turkey on top of it. For a more secure turkey, apply a little bit of frosting to help “glue” it into place.
You could also simply put the OREO turkey on top of an OREO cookie (no need to twist it open.) Use chocolate frosting to help “glue” it into place.

Have fun making your OREO turkeys! It is one of the Thanksgiving traditions my children look forward to every year. Thank you for letting me share it with you.
Do you want to see another one of our Thanksgiving traditions? It’s a newer one – and a bit healthier than this one!
Check out our Veggie Turkey tray. A turkey made out of vegetables inspires even my pickiest kids to eat their veggies.
Love OREO cookies? Check out my 5 Tips for Freezing OREOs.
One of my most pinned posts is inspired by Disney’s FROZEN movie: Sparkling OREO Pops. You can easily make chocolate covered OREOs in Elsa, Anna and Olaf’s favorite colors!


How to Make an OREO Turkey for Thanksgiving
Start an OREO Turkey Tradition for Thanksgiving this year. Easy and fun to make and eat. Perfect Thanksgiving craft for the kids table.
Materials
- OREO cookies *Double Stuffed OREO cookies work best (2 per turkey)
- Mini Reese's peanut butter cups (1 per turkey)
- Candy eyes
- Orange, Yellow and Brown M&Ms Candy
- Candy Corn
- Chocolate Frosting in a Can
- Plastic Knives
Instructions
1. Use a plastic knife to apply chocolate frosting along the top edge of an OREO cookie. The frosting is basically the "glue" that is going to help hold our turkey together. Feel free to use as much as needed.
Carefully stick the tips of 6 candy corns into the OREO cookie's white frosting. *This is why Double Stuffed OREOs work better - there is more room for the candy corns to fit into the cookie.
The orange and yellow part of the candy corns will stick out and look like turkey feathers.
2. Use frosting to attach the peanut butter cup to the lower half of the OREO cookie for the turkey's head.
Add more frosting to place the candy eyes, coated candy beak (we used orange) and various colors of coated candies above the peanut butter cup turkey head.
3. Carefully twist open another OREO cookie and place the OREO turkey on top of it. For a more secure turkey, apply a little bit of frosting to help "glue" it into place.
You could also simply put the OREO turkey on top of an OREO cookie (no need to twist it open.) Use chocolate frosting to help "glue" it into place.
Your OREO turkey is now ready to display or eat!
Recommended Products
As an Amazon Associate and member of other affiliate programs, I earn from qualifying purchases.
-
 Duncan Hines Dolly Parton's Favorite Chocolate Buttercream Flavored Cake Frosting, 16 oz.
 -
 OREO Double Stuf Chocolate Sandwich Cookies, Family Size, 3 Packs
 -
 M&M'S Milk Chocolate Candy, Super Bowl Chocolates Party Size, 38 oz Bag
 -
 REESE'S Miniatures Milk Chocolate Peanut Butter Cups, Halloween Candy Party Pack, 35.6 oz
 -
 Party Dimensions Plastic 300 Count Cutlery Combo Box, Clear, Combo Box, Clear 300 Count
 -
 Tiny Expressions - Fall Thanksgiving Placemats for Kids (Pack of 12 Turkey Placemats) | Coloring Activity Paper Table Mats for Children to Write Thankful List | Disposable Bulk Bundle Set


Marisa says
These came out so cute, I love it! What a fun activity!
Nicole says
Thank you, Marisa!
Pamela @ Brooklyn Farm Girl says
Hehehe, these little Oreo turkeys sure are cute! Plus I love turkeys so I wouldn’t mind gobbling them up… 😉
Nicole says
Hi Pamela! Thanks so much, OREO turkeys are so good, I never have any issues finding people willing to gobble them up. LOL Have a Happy Thanksgiving! –Nicole
Michelle James says
These are so adorable! Shared on FB! Thanks for co-hosting! #HomeMattersParty
Nicole says
Hi Michelle, thank you so much for sharing this post! Hope you have a Happy Thanksgiving! –Nicole
Sahana says
Aww!!! So cute, Nicole. Love it.Very Creative. #HomeMattersParty
Nicole says
Thank you, Sahana!